REVIEW Staff User Guide
- What is REVIEW?
- System requirements and access details
- Adding a link to REVIEW in a UTSOnline Subject
- Logging in/welcome screen overview
- Allocating staff to subjects and assigning roles
- Adding a staff member to a subject
- Changing a staff member’s role in a subject
- Removing a staff member from a subject
- Creating assessment tasks and configuring assessment task options
- Creating assessment criteria
- Creating criteria and linking criteria to CILOS
- Adding Criteria comments
- Creating a rubric
- Cloning an Assessment Task
- Using Classes and Teams
- Classes
- Manually Creating Classes
- Manually Deleting a Class
- Manually adding Student(s) to a Class
- Manually removing Student(s) from a Class
- Manually assigning/removing a Teacher to/from a Class
- Uploading Students into Classes
- Uploading changes to Classes
- Teams
- Publishing Results and sending notifications
- The Publishing Tab
- Publishing Results
- Unpublishing Results
- Notify Students and Staff about Published feedback
- View existing notifications
- Student Results
- Reports (including marks/grades export)
What is REVIEW? *
REVIEW is a criteria-based online marking system. REVIEW allows teaching staff to easily assess student work against a set of pre-defined criteria, all of which are linked to Graduate Attributes (GAs) and Course Intended Learning Outcomes (CILOs). In the Business School a CILO is known as a Program Learning Goal (PLG).
Some of the main benefits of using REVIEW for teaching staff are:
- Paperless marking and return of feedback to students
- Coordinators can monitor the progress of marking and feedback across all tutorials in a subject
- Instant access to feedback from the moment the publish button is clicked (with or without marks)
- Automatic calculation of final marks/grades for a subject if all assessment tasks are marked in REVIEW (or marks are uploaded via spreadsheet)
- Export of marks and comments for all tasks with weighted total for the Subject
- Import of marks from quizzes and exams to link to Course Intended Learning Outcomes
- Individualised reports on a student’s progress over a degree for both students and staff
System requirements and access details *
REVIEW is a web-based application that runs on any of the UTS supported browsers (Chrome, Firefox, Internet Explorer, Safari) on Windows and Mac OSX based computers. Full details on supported versions can be found on the UTSOnline Supported Operating Systems and Browsers page.
Thought not officially supported, REVIEW can also be used on Android tablets and smartphones by both staff and students (Chrome recommended). It can also be used on iPads (Safari recommended).
Staff and students can access REVIEW via a link in UTSOnline. This link needs to be created by the Subject Coordinator but will normally be found in the same place that assessments are submitted.
REVIEW can also be accessed at https://uts.review-edu.com/uts.
Adding a link to REVIEW in a UTSOnline Subject *
Subject Coordinators should create an LTI link to REVIEW in their UTSOnline subject. Staff and students who use this LTI link will be automatically logged into REVIEW.
To add an LTI link to REVIEW, complete the following steps:
- Go to the content folder in UTSOnline where you want to create a link to REVIEW. This will normally be the folder where you ask students to submit their assessment tasks.NOTE: it is not possible to create a link to REVIEW in the main subject menu.
- Open the Build Content menu
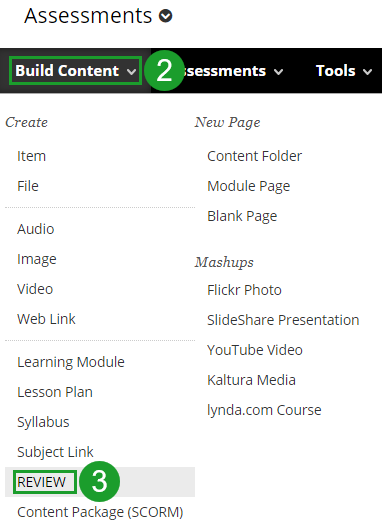
- Choose REVIEW
- Enter “REVIEW” in the Name field

- Click Submit
A link to REVIEW will appear. Depending on your site’s configuration there will be either (a) Text with and icon or (b) Text only

Clicking on the link to REVIEW will automatically log the user into REVIEW in a new window.
Logging in/welcome screen overview *
After logging into REVIEW you will be presented with a list of subjects that you are teaching during that calendar year. Figure 6 shows a welcome screen for a staff member who is coordinating one subject in 2016. If the subjects you are coordinating are not listed please contact your faculty academic programs office

To work on a subject in the current year choose a subject from either list (A) or (B). To find a subject from a previous year and/or semester select the year (C) and Semester (D) options. This will update lists (A) and (B) and allow you to access subjects taught at that time.
To see a summary of the assessment tasks for a subject select the Details drop down (1). To check the contact information for your REVIEW account, select the Details button located next your name and Faculty (2).

Once a subject has been selected you will be provided with a range of tabs that allow you to manage the subject in REVIEW. These functions include:
1. Home: Returns you to this screen
2. Staff Roles: Used to add/remove staff from the current subject. Staff roles may also be changed within the subject (e.g. from Tutor to Subject Coordinator and vice versa)
3. Task Setup: Used to create/modify Assessment Tasks. Assessment Criteria may also be created/modified/deleted
4. Class Editor: Used to create Class groups (e.g. tutorials, labs) and Teams (used for group assessment work)
5. Marking: Used to mark individual and team assessment tasks
6. Publish: Used to Publish results to students and to “un-publish” previously Published marks. Also used to notify students that results are available
7. Student Results: Used to check individual student results measured against Graduate Attributes. For individual task and overall subject results see 8.
8. Reports: Used to access/export data on single task results, overall subject results, staff averages etc.
Allocating staff to subjects and assigning roles *

The Staff Roles tab allows a Subject Coordinator to add or remove staff from the subject.
The Subject Coordinator may also change the role of a staff member in the subject (e.g. from Tutor to Lecturer and vice versa).
IMPORTANT: Subject Coordinators cannot allocate the Subject Coordinator role to another staff member. If the Subject Coordinator requires another staff member to have Subject Coordinator access they must formally request it from IT via ServiceConnect. LX.lab staff are unable to change any staff member’s access level.
PLEASE NOTE: Staff with Subject Coordinator access have the ability to make changes that are difficult and/or impossible to reverse. Subject Coordinator access should only be given to non-coordinators in exceptional circumstances.
Adding a staff member to a subject *
To add a staff member to a subject:
- Type their name or staff number in the search box as shown below:

- When the correct staff member’s name/staff ID is displayed click on their name to add them to the subject. The staff member will be automatically assigned to the Tutor role (see Figure 10 below). If more staff members need to be added repeat the process until all required staff members have been added.

- Click
 to complete adding the staff member to the subject
Note: Only staff members with a standard UTS Staff ID are able to use REVIEW. Staff members with temporary Staff IDs that begin with a lower case letter (e.g. m654321) are not currently able to use REVIEW.
Note: The faculty listed next to the user has no effect on the user’s ability to perform the selected role (i.e. Tutors can still mark work in a faculty different to that allocated to them on this screen).
Changing a staff member’s role in a subject *
To change a staff member’s role in a subject:
- Select the check box next to the relevant staff member’s name:

- Choose the appropriate Role from the drop down menu
- Click
 to complete changing the staff member’s role in the subject. A short message confirming that the staff member has been added will be displayed
Removing a staff member from a subject *
To remove a staff member from a subject:
- Select the check box next to the relevant staff member’s name:

- Click
 . A confirmation message confirming the staff member’s removal will be briefly displayed.
Creating assessment tasks and configuring assessment task options *
The following section provides information on how to configure assessment tasks. Information on Assurance of Learning (AOL) tasks is provided in a separate supplement. At UTS only the Business School currently uses AOL.
Assessment tasks are created from within the Task Setup tab shown in Figure 13 below:
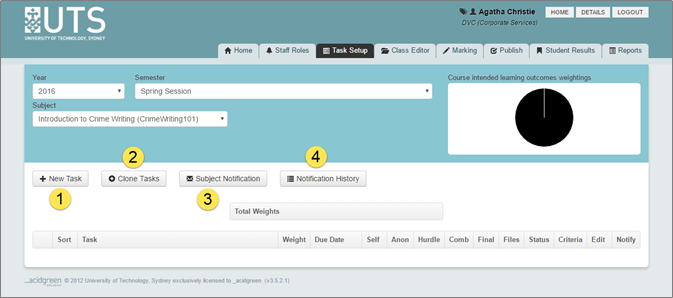
Within the Task Setup tab Subject Coordinators may:
- Create new assessment tasks
- Clone assessment tasks from other subjects (provided you are a Subject Coordinator in both subjects)
- Send notifications about the subject
- View notifications that have previously been sent

Note: The presence of an asterisk (*) indicates a mandatory field.
To create a new assessment task click  . The following options will be displayed:
1. Task Name*: The name of the task as displayed when marking and in the student’s published results. This should be the same as the name of the task displayed in the Subject Outline. If desired, add a prefix to the task name to indicate the order in which assignments are to be submitted (e.g. “A1 Essay Proposal”, “A2 Essay” etc.)
2. Weight*: The amount that the task contributes to the overall mark for the subject
3. Task Criterion*: The method used to weight criteria. Manual weighting requires
the subject coordinator to assign a weight to each criteria (e.g. 30+30+30+10=100) whereas Automatic weighting automatically weights all the criteria equally (e.g. 4×25 = 100)
4. Slider*: The slider used when grading student work for that task. The number and range of sliders is determined by your Faculty Administrator. The most commonly used slider is the standard or uni-proportional marking slider. This slider does not support the display of marks to students:
![]()
The exact (or proportional) marking slider is the only marking slider that supports the display of marks to students. However marks will only be displayed to students if the Show mark to student option is checked (see 8. Below)
![]()
5. Status*: ACTIVE or INACTIVE. ACTIVE tasks are visible to staff and students and can be marked, have their results published etc. INACTIVE tasks may be edited but are not visible to staff or students even when marking has commenced or marks have been published
6. AOL: AOL should only be ticked if a task is being used for Assurance of Learning in the UTS Business School
7. Combined: Failing the aggregated mark of combined tasks results in failing this subject
8. Show mark to student: Shows students a mark in addition to a grade. Turned off by default. Only works with the exact or proportional slider (see 4. above)
9. Anonymous marking: Displays a student ID instead of a name in the marking screen
10. Hurdle assessment: This should only be checked if passing the task is required to pass the subject. Students who fail a hurdle task will have a fail registered for their subject mark irrespective of the other marks gained in the subject
11. Hide from students: When selected this task will not be visible to students. WARNING: If left selected this option may prevent students from viewing published results
12. Self-assess by student: Allows a student to grade their own work using the same criteria as teaching staff. Recommended as this encourages students to reflect on the criteria used and think more critically about their own work
13. Due Date: The date on which students must submit their work for assessment. Has no effect on the display or release of results. For information only.
Creating assessment criteria *
Setting up an Assessment Criteria requires the Subject Coordinator to link a CILO or PLG to each Assessment Criteria. Fields marked with asterisk (*) are mandatory.
Creating criteria and linking criteria to CILOS *
To add Assessment Criteria to an Assessment Task:
- Click on the Setup option in the criteria column as shown below:

- Click
 to create a new criteria:

The Add Task Criterion screen will be displayed:

- CILOs or PLGs for the relevant course/subject will have been pre-loaded by a Faculty or University administrator. Select a CILO from the Course Intended Learning Outcome drop down menu*:

- Select an option from the Subject Learning Objective (SLO) list*. In most cases SLOs or PLOs are not required and will not have been entered into REVIEW by your Faculty Administrator (if required please contact your Faculty Administrator).
If no Subject Learning Objective is required choose No Subject Learning Objective from the drop-down list. REVIEW only requires an SLO/PLO for AOL.
If AOL is required, please follow the instructions outlined in the AOL supplement and skip to the Creating a criteria comment library section.

- If No Subject Learning Objective has been selected then select the Non-AOL radio button as shown above. Note: The Task Criterion Vault is only used for AOL tasks.
- Once CILO and SLO choices have been made the Task Criterion name field will appear. Enter the name of an Assessment Criteria in this field*
- If desired, enter a Task Criterion Description
- If manual weighting was selected during Assessment Task setup enter a value in the Weight* field. If automatic weighting was selected this field will not appear
- Click
 * to finish creating the Assessment Criteria
 - If more Assessment Criteria are required click
 and repeat the steps listed above. If a rubric or criteria comments are required see the following two sections: Creating a rubric and/or Creating a criteria comment library

Adding Criteria comments *
Once a criterion has been created a set of Criteria comments may be added. In the current version criteria comments may only be added to the library before marking has commenced. A future version will allow criteria comments to be managed from within the marking screen.
To add a criteria comment:
- Type or paste the comment into the Comment Library field
- Click Add/Update in Library to add the comment to the list

Further documentation on this feature will be added when it has been relocated to the marking screen.
Creating a rubric *
To create a rubric for an Assessment Criteria click on the button from with an Assessment Criteria. The following fields will be displayed:

Enter a description for each grade in the related rubric field and click (1) to confirm the values. The descriptions will be displayed against the sliders on the staff marking screen, student self-assessment screen and student results screens.
Cloning an Assessment Task *
REVIEW allows a subject coordinator to copy an Assessment Tasks from one subject to another. Assessment Tasks may be copied from any semester or subject that the Subject Coordinator has access to. To clone an Assessment Task, click on the button in the Task Setup tab and follow steps listed below:
- Enter part of the subject name or code in the search box, and then select the relevant subject to copy from. If the subject does not display when the correct keyword/number is entered then you do not have access to that subject. Please contact your Faculty Administrator to arrange access

- A list of tasks available to be copied will be shown in the left hand column. To copy a subject select the relevant assessment task and click on the
 button. To select more than one task to copy at a time hold down ether the Control key (on Windows) or Command key (on Mac) and click on all of the Assessment Tasks you wish to copy

- Click on the
 button to complete copying the Assessment Task(s)

The task(s) will now appear in the list of Assessment Tasks for the subject they have been copied to. IMPORTANT: By default any copied Assessment task will have been marked as Inactive. The date and time the assessment task(s) were copied will have been added to the end of the name for that assessment task
- To resolve these issues, edit the assessment task details to set the task to Active and change the task name if required

Using Classes and Teams *
REVIEW supports grouping students by both Class and Team.
Classes are used to sort students for marking, publishing results and reporting.
Teams are used for marking Team assessments. In Team assessments all students in the team receive the same grade and feedback by default (though results can be modified for individuals if required).
Both Class and Team allocation functions are located under the Class Editor tab.
The active function (i.e. Class allocation or Team allocation) is indicated by:
- The text in the centre of the screen
- Not being able to select that function (i.e. in Figure 24 the Introduction to Crime Writing option is greyed out).

Classes *
Classes may be added to REVIEW manually via the web interface or by spreadsheet upload. Both methods may also be used to add or remove students from existing classes, though staff can only be assigned to classes via the web interface.
Manually Creating Classes *
To manually create a class in REVIEW:
- Select Create
- Type the name of the class in the Add Class field
- Click Add New to create the class

- The message “Success: Created Successfully” will be displayed.
Manually Deleting a Class *
Classes may only be deleted via the web interface. Only one class may be deleted at a time.
To delete a Class:
- Select Update
- Select the Class from the Class Name drop down menu
- Click Delete

- When prompted, click OK to confirm deletion. All students in the class will be unassigned.

- The message “Success: Successfully Deleted: refresh to see changes” will be displayed.
Manually adding Student(s) to a Class *
To add students to a Class via the web interface:
- In the Class Allocation section, click Update
- Select the relevant Tutorial from the Class Name drop-down list

- Select the relevant student(s) from the Unassigned column. To add more than one student hold down the ctrl key (Windows) or cmd key (Mac) while selecting students
- Click Add

- Click Save to finalise adding the student to the class
- The message “Success: Saved Successfully” will be displayed and the student’s name will appear in the Assigned column

Manually removing Student(s) from a Class *
To manually remove a student from a Class:
- In the Class Allocation section, click Update
- Select the relevant Class from the Class Name drop-down list

- Select the relevant student(s) from the Assigned column. To add more than one student hold down the ctrl key (Windows) or cmd key (Mac) while selecting students
- Click Remove

- Click Save to finalise adding the student to the class

- The message “Success: Saved Successfully” will be displayed and the student’s name will appear in the Unassigned column
Manually assigning/removing a Teacher to/from a Class *
To manually assign a Teacher to a Class:
- Select the desired Tutorial from the Class Name drop down
- Select the Teacher from the Assigned Teacher drop down
- Click Save to finalise assigning the teacher to the class

- The message “Success: Saved Successfully” will be displayed.
To manually remove a Teacher from a Class follow the steps above and assign either (a) a different staff member or (b) select Please Select (this will leave the Class without an assigned staff member).
Uploading Students into Classes *
Students may be assigned to classes by uploading a correctly formatted CSV file.
IMPORTANT:
- When saving the CSV file in Excel please choose the file format CSV (Comma Delimited). Other CSV formats (e.g. CSV UTF-8, CSV MS-DOS, CSV Macintosh) will NOT work
- The Class and Student headers are mandatory and are case sensitive
- First and Last Name information is not required and causes errors if included
The file must contain the name of the Class and the student ID number in the following format:
| Class | Student |
| Tutorial 1 | 12345678 |
| Tutorial 2 | 98765432 |
| Tutorial 1 | 56782345 |
HINT: Information on class group membership is most reliably sourced from My Subject Activities (a.k.a MSA+). Always source and upload class group information after the cut-off date for changing classes. This minimises the need to make changes later in the session.
Please use the REVIEW Class Group Setup Template V2 for Excel if you are uploading class groups from My Subject Activities (a.k.a MSA+). This will help you create a CSV file to upload to REVIEW. Instructions on how to export data from MSA+ are found in the file.
To upload a list of students in classes:
- Click Create
- Select Upload New

- Select Choose File and locate/select the source CSV file
- Click Upload & Import

- The file will be processed and the message “Import Completed: Refresh to see changes” will be displayed, along with the number of Classes successfully created.

Uploading changes to Classes *
IMPORTANT: When updating classes via spreadsheet upload ALL students in the included classes will be unenrolled and then re-enrolled. Classes not included in the spreadsheet will not be affected.
To update Classes via spreadsheet upload:
- Select Create (this is the correct option – the Update option only works for manual changes)
- Select Update Existing

- Select Choose File and locate/select the source CSV file
- Click Upload & Import

- A progress bar will be displayed until the upload is completed, after which the message “Import Completed: refresh to see changes” will be displayed. The number of changed enrolments will also be displayed.
Teams *
Teams may be added to REVIEW manually via the web interface or by spreadsheet upload. Both methods may also be used to add or remove students from existing Teams.
HINT: Teams may only be deleted via the web interface. Teams may only be deleted if no marks exist for the team. This prevents marks from being accidentally deleted.
IMPORTANT: Before creating a Team make sure that:
- The Task you wish to created classes for is selected

Manually Creating Teams *
To manually create a Team in REVIEW:
- Select Create
- Type the name of the Team in the Add Team field
- Click Add New to create the Team

- The message “Success: Created Successfully” will be displayed
Manually Deleting Teams *
IMPORTANT: Teams may only be deleted if no marks exist for the team. This prevents marks from being accidentally deleted.
To delete a Team:
- Select Update
- Select the Team from the Team Name drop down menu
- Click Delete

- When prompted, click OK to confirm deletion. All students in the Team will be unassigned.

- The message “Success: Successfully Deleted: refresh to see changes” will be displayed.
Manually Adding Students to a Team *
IMPORTANT: Only add students to a Team if team marking is required (i.e. students in the team will usually receive the same grade for the assignment).
IMPORTANT: If a student is added to a Team where marks and feedback exist then that student will be allocated the same marks and feedback as the students already in the team. The exception is if students have been allocated individual marks in another team; if moved these students will retain their individual marks and feedback but acquire the feedback for the new team.
To add students to a Team via the web interface:
- In the Class Editor tab, choose the assessment task you wish to add teams for:

HINT: A greyed out task is the currently selected task.
- If required, select Update in the Team Allocation section
- Select the relevant Team from the Team Name drop-down list
- Select the relevant student(s) from the Unassigned column. To add more than one student hold down the ctrl key (Windows) or cmd key (Mac) while selecting students
- Click Add. The name(s) of the student(s) to be added to the team will appear in the Assigned column

- Click Save to finalise adding the student(s) to the Team

- The message “Success: Saved Successfully” will be displayed and the student’s name will appear in the Assigned column
Manually removing Student(s) from a Team *
HINT: When removing a student from a team always ensure that you have the correct task selected
To manually remove a student from a Team:
- In the Team Allocation section, click Update
- Select the relevant Team from the Team Name drop-down list

- Select the relevant student(s) from the Assigned column. To add more than one student hold down the ctrl key (Windows) or cmd key (Mac) while selecting students
- Click Remove. The student’s name will appear in the “Select to assign” column


- Click Save to finalise adding the student to the Team
- The message “Success: Saved Successfully” will be displayed and the student’s name will appear in the Unassigned column
Uploading Students into Teams *
IMPORTANT:
Students may be assigned to Teams by uploading a correctly formatted CSV file. The CSV file must contain the name of the Team and the student ID number in the following format:
| GROUP_NAME | STUDENT_NO |
| Team 1 | 12345678 |
| Team 2 | 98765432 |
| Team 1 | 56782345 |
IMPORTANT:
- Only upload students to a Team if team marking is required (i.e. students in the team will usually receive the same grade for the assignment)
- When saving the CSV file in Excel please choose the file format CSV (Comma Delimited). Other CSV formats (e.g. CSV UTF-8, CSV MS-DOS, CSV Macintosh) will NOT work
- The Team and Student headers are mandatory and are case sensitive. First and Last Name information is not required and causes errors if included
HINT: Team membership data can be created manually in a spreadsheet or by exporting Teams created in UTSOnline. The same team information can also be used to create Groups for Self and Peer assessment in SPARKPlus.
To upload a list of students in Teams:
- Click Create
- Select Upload New

- Select Choose File and locate/select the source CSV file
- Click Upload & Import

- The file will be processed and the message “Import Completed: Refresh to see changes” will be displayed, along with the number of Teams successfully created.

Uploading changes to Teams *
IMPORTANT: If a student is added to a Team where marks and feedback exist then that student will be allocated the same marks and feedback as the students already in the team. An exception is if the student has been allocated individual marks/feedback in another team; if moved these students will retain their individual marks and feedback but only acquire the feedback for the new team.
IMPORTANT: When updating classes via spreadsheet upload ALL students in the included classes will be unenrolled and then re-enrolled. Classes not included in the spreadsheet will not be affected.
To update Classes via spreadsheet upload:
- Select Create (this is the correct option – the Update option only works for manual changes)
- Select Update Existing

- Select Choose File and locate/select the source CSV file
- Click Upload & Import

- A progress bar will be displayed until the upload is completed, after which the message “Import Completed: refresh to see changes” will be displayed. The number of changed enrolments will also be displayed.
Publishing Results and sending notifications *
Assessment results are hidden from students until published by a Subject Coordinator or Lecturer. This allows some results to be withheld (e.g. where double marking is required) while others are made available.
Email notifications may be sent to those students whose results have been published.
IMPORTANT: Results that have not been published may be altered. Results that have been Published can only be altered by un-publishing them. Changes may then be made to marks and/or feedback via the Marking tab prior to re-publishing.
HINT: Where Classes or teams exist results may also be released on a Class by Class or Team by Team basis.
The Publishing Tab *
The Publishing Tab contains all the functions required to Publish or Unpublish student results.

Publish Tab Legend
1. Task – List of Tasks to Publish/Unpublish
2. Class – List of Classes to Publish/Unpublish
3. Team – List of Teams to Publish/Unpublish
4. Require Publishing – the number of students whose work has been marked and may be published
5. Marking Incomplete – the number of students whose work is yet to be marked
6. Published – the number of students whose work has been marked and published
7. Not Published Column – displays the names of all students whose work has been marked and can be published. The enter keyword box can be used to filter/specify students. The Check all and Uncheck all options can be used to select/deselect all students in the list.
8. Published Column – displays the names of all students whose work has been marked and published. The keyword and Check all/Uncheck all features work as above.
9. Publish Button – Transfers selected students from the Unpublished column to the Published column and makes their results visible
10. Unpublish Button – Transfers selected students from the Published column to the Unpublished column and hides their results
11. Notify – Opens options for sending notification emails to students
Publishing Results *
To Publish student results:
- Select the relevant task from the Task menu
- If required, filter the available students by selecting a Class or Team. Alternatively, enter a keyword to filter students by name
- Select one or more students using the check boxes or use the Check all button to select all the displayed students
- Click the Publish button to make the selected students’ results available

- The selected students’ names will appear in the Published column
- The message “You have successfully published the student feedback” will be displayed

Unpublishing Results *
To Unpublish student results:
- Select the relevant task from the Task menu
- If required, filter the available students by selecting the relevant Class or Team. Alternatively, enter a keyword to filter students by name
- Select one or more students individually using the check boxes or use the Check all button to select all the displayed students
- Click the Unpublish button to make the selected students results unavailable

- The selected students’ names will appear in the Not Published column
- The message “You have successfully unpublished the student feedback” will be displayed

Notify Students and Staff about Published feedback *
REVIEW can send a notification to students and staff when feedback is published.
NOTE: Notifications can only be sent for individual assessment tasks. However, when students log into REVIEW they will see all the available (i.e. Published) feedback.
To send a Publish notification:
- Select one or more Students from the Published column in the Publish tab. Use the Check all option or keyword filter if required
- If required, check the box to Include staff in the emails sent. All teaching staff will receive a copy of the notification email. The email will be marked ===STAFF COPY===

- Click Notify to open the email editor screen
- The number Staff and Students that may receive the email will be displayed.
NOTE: Number of potential staff recipients will always equal the total number of staff in the subject, even if the Include staff in emails option is NOT selected. The text “A copy will be sent to all staff” will also be displayed. However this will ONLY occur if the Include staff in emails option is selected.
- If required, change the subject line of the email
- If required, edit the body of the email. Placeholders may be used to personalise the email, e.g. {STUDENT_FIRSTNAME} will be replaced by the student’s first name.
- If required, select Include Staff in emails. This duplicates step 2 (see above) and can be ignored if the include staff option in step 2 was selected
- Click Send Emails to proceed

- You will be asked to confirm that you wish to send the notification emails. Click OK to proceed.

- A confirmation message will appear just above the number of potential recipients:

View existing notifications *
Existing notifications may be viewed from within the Task setup tab. To access the notifications:
- In the Task Setup tab, select Notification History:

- A list of notifications will be displayed with information on the email subject, sender and date/time the message was sent. To access detailed information click on the Details button in the relevant row.

Student Results *
The Student Results tab provides information on student progress against Course Intended Learning Outcomes and Graduate Attributes. Information on marks and grades can be found on the Reports Tab. The Student Results tab is currently under review. Information will be provided in a future version of this manual.
Reports (including marks/grades export) *
The Reports tab allows teaching staff to immediately view:
- How many students have had their work marked or marked and published
- The grade for each student per individual assessment task
- The final grade for each student in a subject (if available)
IMPORTANT: To see the overall results for a subject set the Task setting to -all (see Figure 69 below).
The most commonly produced reports are:
- Subject results – shows the total mark and grade for the subject, plus the mark and grade per student for each assessment task
- Task results – the mark and grade per student for an individual assessment task plus staff and student comments. Information on penalties applied (if any) is also included
- Staff average – the average total mark and grade per marker for an individual assessment task, plus the average mark and grade for each criterion
IMPORTANT: The final grade for a student is not calculated until all of their assessment tasks have been marked AND published. If a student does not submit a task they should be given a zero mark and the result published. If a marker has a large number of non-submissions this will have an effect on their average mark for that assessment task.
HINT: If a student does not have a final grade but grades show for each individual assessment task then please check that the result for each task has been published.
HINT: If you are using REVIEW to enter results that will never be Published to students (e.g. for a final exam) then use the “Hide from students option” during task setup. Selecting this option hides the results from students even when they have been published.
Staff may also produce reports on:
- Mark history – provides all marks (per criterion and total) for any student whose assessment task has been marked more than once
- Criteria marks – the marks and grades per criterion, plus the total mark and grade for a task
- Criteria comments – as per the criteria marks report, plus the comments on each criteria
HINT: The criteria marks report also contains information on whether students have viewed their results, how many times they have viewed their results and how long for.

Reports Tab Legend
1. Task – Selects the task to run a report on. Select “all” to see all data for the subject.
2. Class – Select a class to run a report on or “all” to see all data for the subject.
3. Export as – Choose a file type to export the data in. Available choices are .xlsx (Excel 2007 & up), .xls (Excel 2003 & older) & .csv (Comma Separated Variable)
4. Task results – Produces a report on the selected task including the mark & grade
5. Subject results – Produces a report on all tasks in the subject with marks & grades for each individual task, plus the overall mark & grade
6. Staff average – Produces a report on the average mark per marker for the selected task & related criteria
7. Mark history – Produces a report on students whose work has been marked more than once
8. Staff – Students whose work has been marked but not yet published
9. Pub – Students whose work has been marked and published
10. Grade for a task – Red bold font indicates a published result with a penalty
11. Grade for a task – non-bold black font indicates the result is not published
12. Grade for a task – Bold black font indicates published mark with no penalty
13. Subject Mark – Final subject mark. A blank space indicates one or more task results have NOT been published
Subject results *
To create the Subject results report:
- Select -all in the Task menu
- Select the file format you wish to export the report in. Available choices are .xlsx (Excel 2007 & up), .xls (Excel 2003 & older) & .csv (Comma Separated Variable)
- Click the Subject results button

- The Subject results report will be downloaded in the following format:

| Subject Results Report Legend | ||
| A. Student number | B. Student Course Code | C. Student Last Name |
| D. Student First Name | E. Student Class | F. Assessment task name, Weighting and Mark |
| G. Assessment Grade | H. Final Subject Mark | I. Final Subject Grade |
Task results *
To create the Subject results report:
- Select the relevant task in the Task menu
- Select the file format you wish to export the report in. Available choices are .xlsx (Excel 2007 & up), .xls (Excel 2003 & older) & .csv (Comma Separated Variable)
- Click the Task results button

- The Task results report will be downloaded in the following format:

| Task Results Report Legend | ||||
| A. Student number | B. Student Course Code | C. Student Surname | D. Student First Name | E. Student Class |
| F. Late Penalty in marks | G. Mark & Grade (before Penalty) | H. Final Mark & Grade (after Penalty) | I. Comments (Staff) | J. Student Comments & Comment Word Count |
Staff average *
To create the Staff average report:
- Select the relevant task in the Task menu
- Select the file format you wish to export the report in. Available choices are .xlsx (Excel 2007 & up), .xls (Excel 2003 & older) & .csv (Comma Separated Variable)
- Click the Staff average button

- The Task Staff average report will be downloaded in the following format:

| Staff Average Report Legend | ||
| A. Staff Role in subject | B. Staff Number | C. Staff Last/First Name |
| D. Student count – number of students marked by that staff member | E. Student rating data – not currently implemented | F. Average Student comment word count |
| G. Average Staff comment word count | H. Average Weighted Task Mark – light red figures are above the standard deviation while dark red figures are below the standard deviation | I. Mark and grade for the displayed criteria – light red figures are above the standard deviation while dark red figures are below the standard deviation |
Mark history *
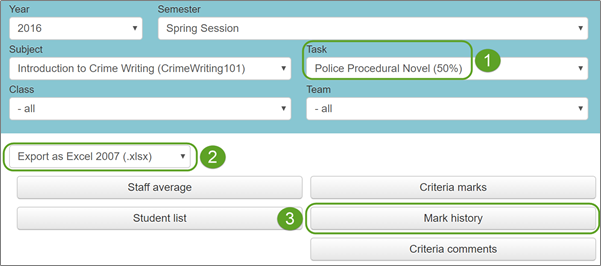
To create the Mark history report:
- Select the relevant task in the Task menu
- Select the file format you wish to export the report in. Available choices are .xlsx (Excel 2007 & up), .xls (Excel 2003 & older) & .csv (Comma Separated Variable)
- Click the Mark history button
- The Task Staff average report will be downloaded in the following format:

| Task Results Report Legend | |||
| A. Student number | B. Student Last Name | C. Student First Name | D. Date/Time of marking (most recent first) |
| E. Name of Marker (Staff) | F. Mark & Grade for displayed criteria | G. Final Mark & Grade after Penalty (most recent first) | |
NB. Staff numbers and some names have been deliberately obscured for security/privacy reasons.